Help:Images
Photos and other visual content displayed on Antwiki are posted from files stored on the Antwiki webserver. To display an image you have on your computer on Antwiki you must first upload the file. Uploaded images are displayed on pages using some relatively easy to learn, but quite specific, syntax. This page explains how to upload and display image files.
If you have a specific image related task you need help with you can click on the appropriate heading in the table of contents to quickly find the specific help you need. If you have never added or edited images on a wiki site you may need to look over this entire page in order to get a good start on working with images.
Introduction
You must have a user account to upload files or add an image to a page.
Image management in Antwiki follows Mediawiki and Mediawiki Commons standards. Much of the information on this page is copied or derived from Mediawiki Image Help and Images and other uploaded files. The purpose of this help page is to provide guidance for common Antwiki specific image-editing tasks. If you want to explore options that go beyond these specifics a good place to begin is to follow the previous two links.
File Attributes
Prior to uploading a file you should be aware of the following details about Antwiki image files.
File Format
Antwiki can accept uploads and display these image file formats:
- jpeg
- jpg
- png
- gif
File Size
Uploaded files cannot be larger than 20 MB.
Image Dimensions
There are a few considerations to keep in mind about the actual width and length of uploaded images.
- The largest width or length of an uploaded file does not need to be more than 1,500 pixels.
- There is no need to load large and small versions of a single image. Images can be scaled when they are added to an Antwiki page.
- Images are typically displayed on a page at a size that is much smaller than the uploaded file. The original image can be viewed by clicking on the image.
File Name
There are no requirements concerning files names. Even so it can be helpful to use a name that provides some clue as to what the image is about. IMG_03597.jpg, for example, is not as informative as Anoplolepis gracilipes foraging.jpg.
You do not need to rename an image file prior to uploading. The uploading procedure (see the next section) allows you to use the file name of the file you are uploading, e.g., IMG_03597.jpg, or create a new name, e.g., Anoplolepis gracilipes foraging.jpg.
File Copyright
Please go the Antwiki Copyright page to learn what files can and cannot be uploaded and what kind of copyright license should be assigned to uploaded files.
Uploading Files
There are a few things to do before you upload an image. Be sure the file is in a form that will be accepted for uploading. The File Attributes section (above) provides details about these file attributes. You will also need to make note of the directory/folder where the image is stored on your computer.
Uploading a file involves going to the Upload File page, filling in information about the image, and clicking on the “Upload File” button at the bottom of the page. The following explains each of these steps in more detail.
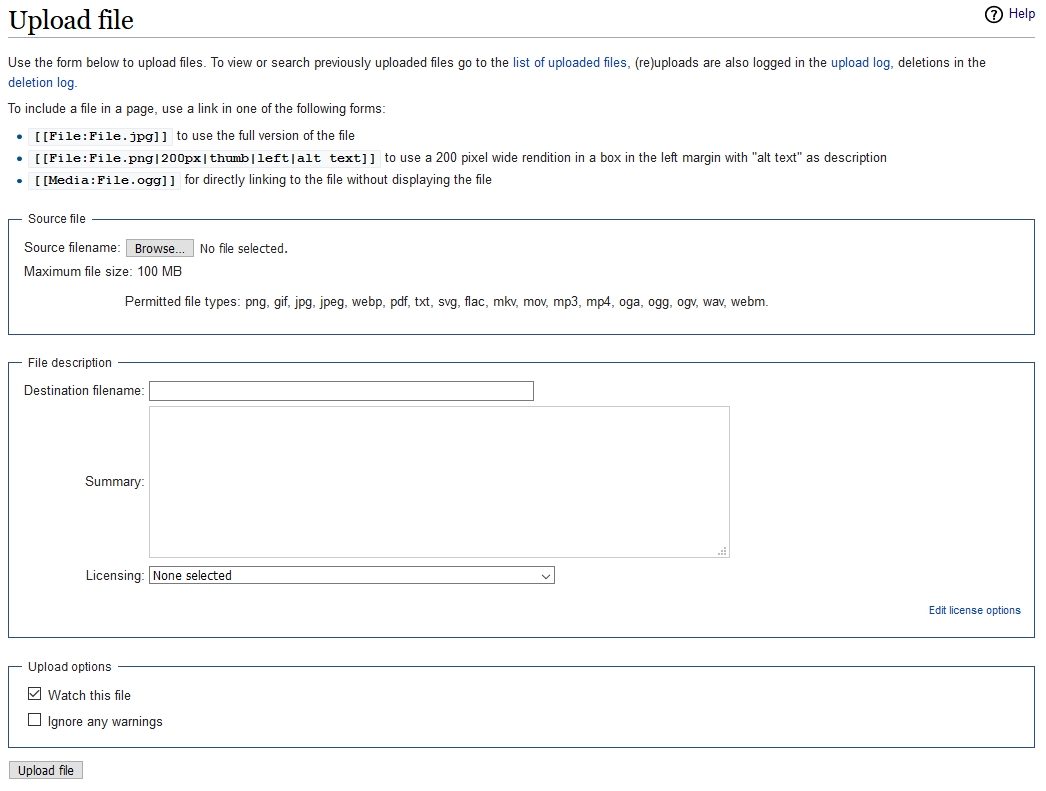
When you are logged in with your Antwiki editing account, there is an "Upload page" link on the left sidebar, under the Tools heading. A screenshot of the this page is shown here, to the right.
There are a few things you will need to fill in and specify on this page.
Source File
Click on the gray “Browse” box to be guided through navigating to the correct local computer folder and selecting your image file. Once completed, you will be back to the upload file page and should see your image to the right of the "Source file" section. The name of the file and its dimensions are included under the image.
File Description
The name of the file you just selected should now be shown in the "Destination Filename" text box. You can leave this as is or you can delete the existing text and create a new name. Spaces between the words of a file name, e.g., "an ant nest.jpg", can be a blank space or an underscore, e.g., "an_ant_nest.jpg". The file name specified here will be the Antwiki image filename once the file is uploaded.
You can upload a file with only this information but many images are uploaded with information about the file. Anything you type in the "Summary" text box will be uploaded with your image. You can include details about the image such as specimen collection details, who took the photo, the date the photo was taken, a geolocation, etc. It is Ok to leave the summary field blank. Also, you can edit the summary field information later by clicking on the edit tab on the image file page (image file pages are discussed in another section, just below).
Upload
Go to the bottom of the page and click the gray "Upload file" box. The file is uploaded and you will then see the image file page that is created. If you made any errors the file upload page will reload and show a message about the problem. All of the information you have entered will still be on the page. You can fix the problem and upload the image again.
Other Uploading Details
The bulk of images on Antwiki are uploaded with just the file name or with the file name and some informational text. The following are other things you might like to now or consider when you are uploading images.
Licensing
Each editor is responsible for insuring images they upload can be shared on the web (Antwiki Copyright Guidelines). Do not upload any images that you do not have permission to use.
You can choose a license to apply to your content by using the drop down selection list provided on this section of the page. Alternatively, you can declare a copyright license in the summary field and leave this blank.
Upload options
The "Upload options” checkboxes are ignored by most people. You probably want to do the same.
There are many things you can include in the summary section. Here are a few, and you may find others on image file pages you see on Antwiki (you can click the edit tab to see how something is formatted or set up).
Geolocation
You can enter lat/long information as text or you can use a template that display geographic/GPS coordinates with a link to a map of the location. See the Geolocation Help to learn more.
Categories
Categories help organize content. See the Categories Help page to learn more about how categories work and how Antwiki suggests categorizing the images you upload.
The File Page
Uploading an image creates a “file page” or “image description page" for the image. The page name consists of the file name and extension, prefixed with "File:" For example, uploading a file with the title “ants.jpg” would create a page named “File:ants.jpg”. The page name is how the image is referenced when you want to display it on an Antwiki page. You can see any file page by clicking on any image you see in Antwiki.
The elements of the File page:
- The Image. If the image dimensions are large the displayed image is typically shown at a smaller size than the original uploaded file. To see the original file just click on the image.
- Image Details. Directly under the image there are details about the image file (file size, image dimensions, etc.) and a link. Clicking on the link, or the image, will load the image in its original form.
- Image Description. Anything added to the Summary section of the upload file page is shown here(photographer, specimen data, etc.).
- Licensing. If there is a copyright license assigned to the Image File it will be shown here.
- File History. A new file can be uploaded to replace the current file. You can click on the text at the end of this section of the page to add a new image file.
- File Usage. A list of Antwiki pages that include this image.
- Categories. These are optional. Categories are used to organize images into groups. Clicking on a category name (shown in red or blue lettering) will take you to a page that shows all the images and pages that have been assigned to a particular category.
The uploaded image, image description, and licensing can be changed from the file page after the file has been uploaded. Editing is done by going to the file page and clicking on the edit tab found in the upper right side of the page.
Updating an Existing File
Sometimes you will want to replace an existing image file with a new version of the file. To do this you click on the text "Upload a new version of this file" at the bottom of the File History window. An Upload File window will open and from there you can select a new file from your computer to upload. Once completed, this image will appear at the top of the File History section.
Deleting and Moving a File
To delete or move (Antwiki-speak for renaming it) hover the mouse pointer over the arrow in the upper right of the screen near the search box. Once the menu drops down select Delete or Move as required. This will open a page where the action can be completed. Note that in both cases the "old" file isn't actually deleted or moved. Instead, redirects are created to the new file, and leaves the original file on the server.
Displaying Images on a Page
The Bare Basics
Any image you want to display on a page must first be uploaded to Antwiki (as explained above). You can work with any images found at the gallery of images and image file list.
Images are referenced by their Image File Name, which is the same as the File Page name, e.g. "File:Pheidole tuxtlasana Wilson 2003.jpg" or "File:Formica-comata 0195.jpg"
The simplest syntax for displaying an image on a page is: [[File:filename.extension|{{width}}]].
Using a real file as an example:
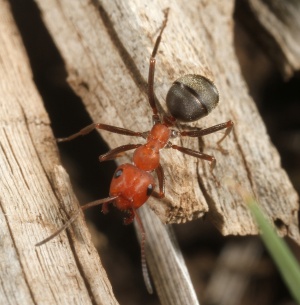
[[File:Formica-comata 0195.jpg|300px]]
The "|300px" specifies the size of the image, in this case 300 pixels wide. If the width is not specified the image will be displayed full-sized, which is generally larger than anyone viewing Antwiki would want to see on a page. There is usually no need to display images larger than 300 pixels wide (but any size can be specified). Images should be balanced with the display of text and clicking on the image will display a larger view.
One simple way to place a single nicely formatted image in a page is to display it as a "thumbnail"
[[File:Formica-comata 0195.jpg|thumb]]
This displays the image with a default width of 180px and places a bordered box around the image
.
Thumb images are displayed on the the right side of the page and the text flows around the image box. It is simple to add syntax to the image specifications and have the image appear on the left side of the page with a caption.
[[File:Formica-comata 0195.jpg|thumb|left|Formica comata worker]]
There are many more nuances in how you can display and position images on a page. See Beyond the Basics (below) to learn more or, if you see an existing image displayed in a manner that you like, click the "edit" tab of the page to see details of the image syntax necessary to display the image.
Beyond the Basics
Display of Multiple Images
There are two ways you can set up a row of images in Antwiki so that they are displayed according to the size of the browser window. This is not fully "responsive" design, i.e., where the images are resized, but the images will be positioned differently in small browser windows. The Proceratium gibbosum species page uses both methods: the "Photo Gallery" section near the top of this species page uses a template (Template:Photo_Gallery) and the two images in the "Caste" section are formatted using HTML lists syntax.
The Photo Gallery template.
{{Photo Gallery
|noheading=any value will hide the "Photo Gallery" heading
|name1=File:Example.jpg
|comment1=this text will be shown under the image
|size1=000px
|name2=File:Example2.jpg
|comment2=text shown under image 2
|size2=000px
etc....
}}
You can display each image at whatever size you prefer, e.g., larger 500px or smaller 200px. The maximum number of images that can be included here is 29. You can see another example using the "photo gallery" template here: Neivamyrmex ectopus.
HTML lists
The second method is to edit images using HTML for lists.
<div><ul>
<li style="display: inline-block;"> [[File:Example.jpg|thumb|none|220px|Caption 1]] </li>
<li style="display: inline-block;"> [[File:Example.jpg|thumb|none|100px|Caption 2]] </li>
<li style="display: inline-block;"> [[File:Example.jpg|thumb|none|150px|Caption 3]] </li>
</ul></div>
This is explained on the mediawiki image help page: [1]
Another Antwiki example using HTML lists formatting is found in the description section of the Pheidole longipesspecies page. In this case, the two images shown of pages from Latreille 1802c include a second style.
<li style="display: inline-block; vertical-align: top;">[[File:Example.jpg|thumb|none|220px|Caption 1]] </li>
The "vertical-align: top;" style aligns each image at the top. This of course only occurs if the browser window is wide enough to fit both images side-by-side. A smaller browser window will show the second image underneath the first. If "vertical-align: top;" is not included here the images will be aligned at the bottom if shown side-by-side, i.e., the relatively short image will be aligned at the bottom of the larger image in a large browser window.
Both of the above methods are for images that you want to show with a caption. If you don't have any captions, you can get the same adjustable display behavior by editing images like this:
[[File:Example1.jpg|220px]]
[[File:Example2.jpg|100px]]
[[File:Example3.jpg|150px]]
[[File:Example4.jpg|250px]]
more photo formatting help
Additional help with captions, borders, galleries and more is carefully explained and documented in already existing non-Antwiki help pages.
- Nice explanations and examples that show how to place and style images on a page:
- A list of image style parameters, defined and explained
- Captions guidelines and suggestions
Taxobox Images
There is a separate help page about taxobox images.
Image Galleries
If you are adding more than a related set of images to a page you should consider placing them in a "gallery." This could be particularly helpful if you have a number of images that form a logical group. Some examples are a set of montage images of different castes or a series of photos showing different nests for a single species.
The formatting and display example here is from Pheidole_bicarinata#Castes.
Looking at the edit page shows the coding for the galleries, in this case a separate one for each caste (queen and male).
====Queen====
<gallery>
File:Pheidole bicarinata queen H MCZ001.jpg
File:Pheidole bicarinata queen L MCZ001.jpg
File:Pheidole bicarinata queen D MCZ001.jpg
</gallery>

====Male====
<gallery>
File:Pheidole bicarinata male H MCZ001.jpg
File:Pheidole bicarinata male D MCZ001.jpg
File:Pheidole bicarinata male L MCZ001.jpg
</gallery>
This entry will display the following:
Galleries of specimen images can be added to the "Castes" section of species pages. Each of these can be preceded by a formatted heading. These headings create entries in the table of contents shown at the top of the page. This means that from the table of contents you can see a list of casts with images can jump to the appropriate image gallery with a single click. Take a look at Pheidole_bicarinata for an example of this.
This entry includes a heading above three images:
<gallery caption="Montage images of a queen">
File:Pheidole bicarinata queen H MCZ001.jpg
File:Pheidole bicarinata queen L MCZ001.jpg
File:Pheidole bicarinata queen D MCZ001.jpg
</gallery>
- Montage images of a queen
Finally, to add a caption below individual images within a gallery add a "|" (pipe) followed by the caption text, like this:
<gallery>
File:Pheidole bicarinata male H MCZ001.jpg |head view
File:Pheidole bicarinata male L MCZ001.jpg |lateral view
File:Pheidole bicarinata male D MCZ001.jpg
</gallery>
InstantCommons
Antwiki has enabled the Mediawiki InstantCommons. This means that all images found in Mediawiki Commons can be accessed in the same way as images uploaded directly into Antwiki. This saves considerable time and effort and minimises duplication.
One caution is that if you try to upload an image that is already found in Mediawiki Commons you will get a "duplicate file found" warning, even though the image hasn't been uploaded to Antwiki. While you can ignore this warning and add this second copy, it would be better to abort the upload and use the Mediawiki Commons copy. Also note that for performance reasons no more than three Mediawiki Commons images should be added on any single page. This is because Commons images must be transferred to the Antwiki server for processing (such as resizing) before the page can be displayed. This can take considerable time when a large number of images are involved.


